Rava uppu mavu റവ ഉപ്പ് മാവ്
- റവ - അര കിലോ
- കടുക് - 1 സ്പൂണ്
- വറ്റല്മുളക് - 3 എണ്ണം
- വെളിച്ചെണ്ണ - 2 സ്പൂണ്
- കറിവേപ്പില - 1 കതിര്
- ഉപ്പ് - പാകത്തിന്
- സവാള - 2 എണ്ണം
- പച്ചമുളക് - 4 എണ്ണം
- ഇഞ്ചി - ചെറിയ കഷ്ണം
- കാര്രെറ്റ് -1 എണ്ണം

Rava uppu mavu റവ ഉപ്പ് മാവ്
- ഗ്രീൻ പീസ് വേവിച്ചത് - ആവശ്യത്തിന്
പാകം ചെയ്യുന്ന വിധം
- ഒരു ചീനച്ചട്ടി ചൂടാക്കി അതിൽ വെളിച്ചെണ്ണ ഒഴിച്ച് കടുക് പൊട്ടിച്ച് വറ്റല്മുളക് ഇടുക.
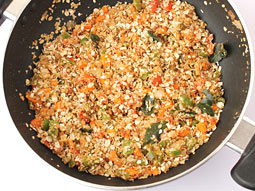
- പിന്നീട് സവാള ,പച്ചമുളക്, ഇഞ്ചി ,കറിവേപ്പില, കാര്രെറ്റ് ഇവ വഴറ്റുക അതിൽ ഗ്രീൻ പീസ് ഇടുക.
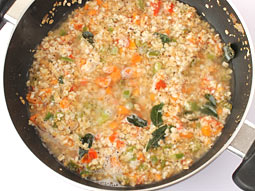
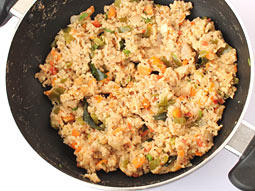
- വാടിയ ശേഷം 5 ഗ്ലാസ് വെള്ളം ഒഴിച്ച് അതിൽ ആവശ്യത്തിനു ഉപ്പ് ഇട്ടു വെള്ളം തിളക്കുമ്പോൾ അതിൽ റവ ചേർത്ത് ഇളക്കുക.
- റവ - അര കിലോ
- കടുക് - 1 സ്പൂണ്
- വറ്റല്മുളക് - 3 എണ്ണം
- വെളിച്ചെണ്ണ - 2 സ്പൂണ്
- കറിവേപ്പില - 1 കതിര്
- ഉപ്പ് - പാകത്തിന്
- സവാള - 2 എണ്ണം
- പച്ചമുളക് - 4 എണ്ണം
- ഇഞ്ചി - ചെറിയ കഷ്ണം
- കാര്രെറ്റ് -1 എണ്ണം
- ഗ്രീൻ പീസ് വേവിച്ചത് - ആവശ്യത്തിന്
|
| Rava uppu mavu റവ ഉപ്പ് മാവ് |
- ഒരു ചീനച്ചട്ടി ചൂടാക്കി അതിൽ വെളിച്ചെണ്ണ ഒഴിച്ച് കടുക് പൊട്ടിച്ച് വറ്റല്മുളക് ഇടുക.
- പിന്നീട് സവാള ,പച്ചമുളക്, ഇഞ്ചി ,കറിവേപ്പില, കാര്രെറ്റ് ഇവ വഴറ്റുക അതിൽ ഗ്രീൻ പീസ് ഇടുക.
- വാടിയ ശേഷം 5 ഗ്ലാസ് വെള്ളം ഒഴിച്ച് അതിൽ ആവശ്യത്തിനു ഉപ്പ് ഇട്ടു വെള്ളം തിളക്കുമ്പോൾ അതിൽ റവ ചേർത്ത് ഇളക്കുക.
Fluffy Rice Pancake — Idli
 Ingredients
1 cup basmati rice
¼ cup parboiled rice
¼ cup split black gram (urad dal)
water, as required (about ¾ cup)
salt, to taste
idli moulds
Directions
Place rice and lentils in a sieve and rinse well. Add water and set aside to soak for a minimum of 6 hours; drain. Grind to a fine paste in a blender by adding enough water, little by little, to form a thick consistency batter (almost similar to a cake batter). Take care not to add too much water lest the batter gets runny and you end up with flat idlis.
Pour into a large container that can hold up to three times the volume of the batter; season. Leave to ferment for 12 hours or overnight, covered, in a warm place until the batter has expanded to almost double its volume. Fermentation can be quite a challenge during winter. In this case, the key is to leave the batter in a warm place like the oven, if you have one. Preheat the oven for a few minutes until warm; switch off; allow to cool for 5 minutes; leave the batter inside; close the oven.
Once the batter is well fermented, gently stir to even out the aeration. Remember not to stir too much, or you’ll end up killing the air bubbles.
Meanwhile, fill the pressure cooker with water below the level of the idli stand, and bring it to boil on high heat. Wipe the moulds of the idli trays with a piece of muslin dipped in a bit of oil. Spoon in the batter to fill the moulds and place the stand inside the cooker. Close lid without placing the vent weight. Steam on high for 5-6 minutes or until you have fluffy cakes; remove from heat. Again, don’t leave the batter in steam for long as the idlis tend to lose it’s softness.
Take out the idli stands, allow to cool a bit, and then carefully spoon out the cakes. Enjoy with a bowl of sambar and a variety of chutneys
Ingredients
1 cup basmati rice
¼ cup parboiled rice
¼ cup split black gram (urad dal)
water, as required (about ¾ cup)
salt, to taste
idli moulds
Directions
Place rice and lentils in a sieve and rinse well. Add water and set aside to soak for a minimum of 6 hours; drain. Grind to a fine paste in a blender by adding enough water, little by little, to form a thick consistency batter (almost similar to a cake batter). Take care not to add too much water lest the batter gets runny and you end up with flat idlis.
Place rice and lentils in a sieve and rinse well. Add water and set aside to soak for a minimum of 6 hours; drain. Grind to a fine paste in a blender by adding enough water, little by little, to form a thick consistency batter (almost similar to a cake batter). Take care not to add too much water lest the batter gets runny and you end up with flat idlis.
Pour into a large container that can hold up to three times the volume of the batter; season. Leave to ferment for 12 hours or overnight, covered, in a warm place until the batter has expanded to almost double its volume. Fermentation can be quite a challenge during winter. In this case, the key is to leave the batter in a warm place like the oven, if you have one. Preheat the oven for a few minutes until warm; switch off; allow to cool for 5 minutes; leave the batter inside; close the oven.
Once the batter is well fermented, gently stir to even out the aeration. Remember not to stir too much, or you’ll end up killing the air bubbles.
Meanwhile, fill the pressure cooker with water below the level of the idli stand, and bring it to boil on high heat. Wipe the moulds of the idli trays with a piece of muslin dipped in a bit of oil. Spoon in the batter to fill the moulds and place the stand inside the cooker. Close lid without placing the vent weight. Steam on high for 5-6 minutes or until you have fluffy cakes; remove from heat. Again, don’t leave the batter in steam for long as the idlis tend to lose it’s softness.
Take out the idli stands, allow to cool a bit, and then carefully spoon out the cakes. Enjoy with a bowl of sambar and a variety of chutneys
Easy Palappam
Ingredients
White raw rice - 3 cups (finely powdered)
Coconut - 1
Yeast - 1 tsp
Sugar - 4 tspn
Water - 1 cup for mixing
Lukewarm water - 1/2 cup
Cooked rice - 2 tbsp
Salt - 1/2 tbsp
White raw rice - 3 cups (finely powdered)
Coconut - 1
Yeast - 1 tsp
Sugar - 4 tspn
Water - 1 cup for mixing
Lukewarm water - 1/2 cup
Cooked rice - 2 tbsp
Salt - 1/2 tbsp
Coconut - 1
Yeast - 1 tsp
Sugar - 4 tspn
Water - 1 cup for mixing
Lukewarm water - 1/2 cup
Cooked rice - 2 tbsp
Salt - 1/2 tbsp
Directions
Prepare yeast solution:
- Mix sugar and yeast and mix with warm water. Keep aside for 10-15 minutes until a froth appears (ferments).
- Grind cooked rice with 1/2 cup of water to make a paste.Sieve the rice flour in to a basin. Mix rice paste, fermented yeast and water. Knead it for about 5 minutes in to a soft dough. Let it ferment for 4 hours.
- Extract the milk from the coconut in 3 cups of water. Add it to the mixed dough and make a thin batter without any lumps. Add sugar according to taste and allow batter to ferment for another 2 hours. Add salt and mix well.
- Warm up the vessel for baking paalappam (Palappam Chatti), rub gingelly oil (Nallenna). Pour 3-4 tablespoons of this mix into the Palappam Chatti and rotate the Chatti by hand so that about 1" of the sides of the chatti is thinly coated and the remaining batter collected at the centre. Care should be taken that it is rotated only twice. Cover with tight fitting lid. lower heat and cook for about 3 minutes.
- When it is ready, the edges resemble crisp lace and centre soft and well risen. Remove from chatti/kadai and it is eaten with chicken curry or vegetable stew.
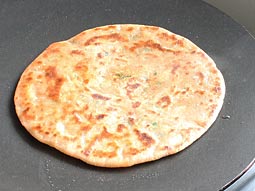
Aloo Paratha Recipe
Aloo Paratha is a delicious shallow fried Indian stuffed bread popular among all generations of people across length and breadth of India. Contrary to popular belief, Punjabi aloo paratha can be easily prepared at home as this recipe uses ingredients that are found in every Indian kitchen. Plus, the detailed instructions with step by step photos will make it a breeze to cook like an expert.

Preparation Time: 15 minutes
Cooking Time: 25 minutes
Serves: 2 servings (6 paratha)
Ingredients: 1 cup + 1/2 cup Wheat Flour 2 medium Potatoes, boiled and peeled 4 tablespoons finely chopped Coriander Leaves 1 teaspoon Lemon Juice 1 teaspoon Sugar 2 Green Chilli, finely chopped 1 teaspoon Garam Masala 1 teaspoon Red Chilli Powder 1 teaspoon grated Ginger Butter 2 tablespoons Oil Salt Water
Directions:
- First prepare dough by taking 1 cup wheat flour, 1 teaspoon oil and salt in a small bowl. Incrementally add water in small quantities and knead smooth and soft dough (like chapati dough). Grease its surface with 1/2 teaspoon oil, cover it with clean muslin cloth and set aside for 15-20 minutes to settle at room temperature.
-
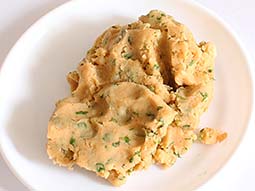 Now, prepare alu paratha stuffing by mixing mashed potatoes, chopped green chillies, red chilli powder, grated ginger, garam masala, sugar, lemon juice and salt in small/medium size bowl. Mix all ingredients properly.
-
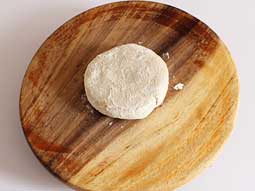
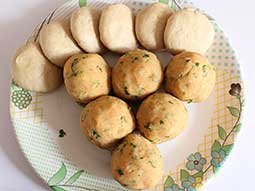 Divide stuffing into 6 equal parts and give them a shape of ball. Divide prepared dough into 6 equal parts, give them a round shape and press a little to flatten like pattie.
-
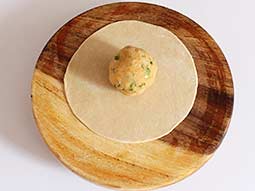 Take one dough pattie and coat it with dry wheat flour on both sides. (It will prevent dough from sticking to rolling board). Put it on rolling board/roti making board (chakla) and roll it out into a circle of approx. 4-5 inch diameter using rolling pin. Put one portion of stuffing in the centre of it.
-
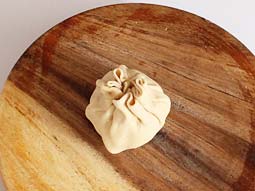 Wrap stuffing ball by lifting all sides of rolled circle towards top, seal the edges and again give it a round ball shape.
-
 Gently press stuffed ball on rolling board and dust some dry flour over it.
-
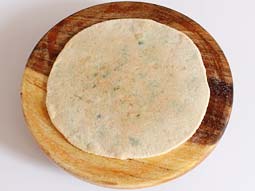 Roll it out into circle of 6-7 inch diameter (like roti or chapati). Do not make it very thin by pressing it too much.
-
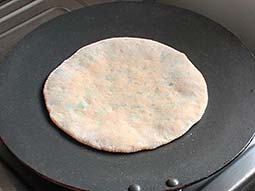 Place it on a hot tava/griddle and cook over medium flame. When tiny bubbles starts to rise on the surface, flip it and reduce flame to low.
-
 Spread 1/2 teaspoon oil around its edge with the help of spatula and cook for approx 30-40 seconds.
-
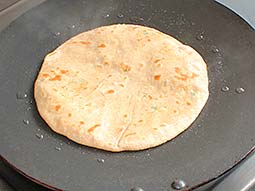
 Flip it again and spread 1/2 teaspoon oil around its edge. Press it with spatula and cook for 30-40 seconds over medium flame. Repeat flip and press process until golden brown spots appear on both sides of paratha. (No need to spread oil after doing it once in previous steps).
-
Transfer it to a plate and spread butter on it. Prepare remaining aloo parathas by following same process. Serve it with tomato raita and pickle.
Tips and Variations:
- Knead very smooth dough to roll them out easily. Use milk instead of water to knead dough for softer outer layer.
- Mash potatoes properly and weed out chunks, if any. This will help rolling them out smoothly.
- Avoid green chilli if you are preparing it for kids.
- Add mint leaves or crushed ginger-garlic in stuffing for spicier taste.
- Based on type of tawa/griddle you are using, you might have to adjust heat intensity while shallow frying.
Aloo Paratha is a delicious shallow fried Indian stuffed bread popular among all generations of people across length and breadth of India. Contrary to popular belief, Punjabi aloo paratha can be easily prepared at home as this recipe uses ingredients that are found in every Indian kitchen. Plus, the detailed instructions with step by step photos will make it a breeze to cook like an expert.
Preparation Time: 15 minutes
Cooking Time: 25 minutes
Serves: 2 servings (6 paratha)
| Ingredients: |
| 1 cup + 1/2 cup Wheat Flour |
| 2 medium Potatoes, boiled and peeled |
| 4 tablespoons finely chopped Coriander Leaves |
| 1 teaspoon Lemon Juice |
| 1 teaspoon Sugar |
| 2 Green Chilli, finely chopped |
| 1 teaspoon Garam Masala |
| 1 teaspoon Red Chilli Powder |
| 1 teaspoon grated Ginger |
| Butter |
| 2 tablespoons Oil |
| Salt |
| Water |
Directions:
- First prepare dough by taking 1 cup wheat flour, 1 teaspoon oil and salt in a small bowl. Incrementally add water in small quantities and knead smooth and soft dough (like chapati dough). Grease its surface with 1/2 teaspoon oil, cover it with clean muslin cloth and set aside for 15-20 minutes to settle at room temperature.
- Now, prepare alu paratha stuffing by mixing mashed potatoes, chopped green chillies, red chilli powder, grated ginger, garam masala, sugar, lemon juice and salt in small/medium size bowl. Mix all ingredients properly.
- Divide stuffing into 6 equal parts and give them a shape of ball. Divide prepared dough into 6 equal parts, give them a round shape and press a little to flatten like pattie.
- Take one dough pattie and coat it with dry wheat flour on both sides. (It will prevent dough from sticking to rolling board). Put it on rolling board/roti making board (chakla) and roll it out into a circle of approx. 4-5 inch diameter using rolling pin. Put one portion of stuffing in the centre of it.
- Wrap stuffing ball by lifting all sides of rolled circle towards top, seal the edges and again give it a round ball shape.
- Gently press stuffed ball on rolling board and dust some dry flour over it.
- Roll it out into circle of 6-7 inch diameter (like roti or chapati). Do not make it very thin by pressing it too much.
- Place it on a hot tava/griddle and cook over medium flame. When tiny bubbles starts to rise on the surface, flip it and reduce flame to low.
- Spread 1/2 teaspoon oil around its edge with the help of spatula and cook for approx 30-40 seconds.
- Flip it again and spread 1/2 teaspoon oil around its edge. Press it with spatula and cook for 30-40 seconds over medium flame. Repeat flip and press process until golden brown spots appear on both sides of paratha. (No need to spread oil after doing it once in previous steps).
- Transfer it to a plate and spread butter on it. Prepare remaining aloo parathas by following same process. Serve it with tomato raita and pickle.
Tips and Variations:
- Knead very smooth dough to roll them out easily. Use milk instead of water to knead dough for softer outer layer.
- Mash potatoes properly and weed out chunks, if any. This will help rolling them out smoothly.
- Avoid green chilli if you are preparing it for kids.
- Add mint leaves or crushed ginger-garlic in stuffing for spicier taste.
- Based on type of tawa/griddle you are using, you might have to adjust heat intensity while shallow frying.
Oats Upma Recipe
Oats are known for their health benefits because of its dietary fibers, iron and cholesterol reducing agents. Oats upma is a fusion of western and Indian ingredients, which combines all health benefits of oats, fresh vegetables and Indian spices. This south Indian recipe of upma prepares a healthy dish that is suitable to be served to kids as well as heart and diabetic patients.

Cooking Time: 20 minutes
Serves: 2 servings
Ingredients: 1 cup Rolled Oats 1/2 teaspoon Mustard Seeds 1/2 teaspoon Cumin Seeds 1 teaspoon Chana Dal (optional) 2 sprigs Curry Leaves 1 medium Onion, finely chopped 1 Green Chilli, chopped 1/4 cup finely chopped Carrot 1/4 cup finely chopped Capsicum 1 Tomato, finely chopped 5-6 fried Cashew Nuts (optional) 2 tablespoons chopped Coriander Leaves Salt 2 tablespoons Cooking Oil or Ghee (clarified butter) 2 cups Hot Water
Directions:
-
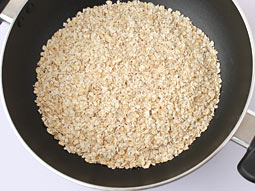 Roast oats in a pan or kadai until they change from white to light brown. Transfer them in a plate and keep aside.
-
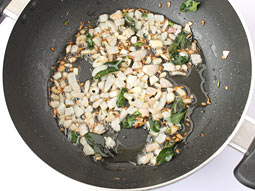 Heat 2 tablespoons oil in a same kadai or pan. Add mustard seeds and cumin seeds. When seeds begin to pop, add chana dal and curry leaves. Sauté until dal turns light brown for approx. 1 minute. Add chopped onion and chopped green chillies, sauté until onion becomes translucent.
-
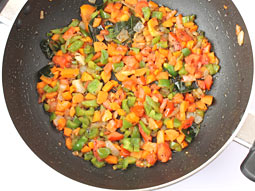 Add chopped carrot, chopped capsicum and chopped tomatoes, sprinkle salt over it and cook for 2-3 minutes.
-
 Add and mix roasted oats and cook for a minute.
-
 Add 2 cups hot water and stir for a minute.
-
 When it starts to boil, cover with a lid and cook over medium flame.
-
 Cook until water is absorbed and oats are cooked thoroughly for approx. 7-8 minutes.
-
 Add chopped coriander leaves and cashew nuts and mix well.
-
Turn off flame and transfer healthy oats upma to a serving bowl.
Tips and Variations:
- If you are using steel cut oats, then add 2½-3 cups water because they take more time to cook.
- You can add vegetables like beans, green peas etc. to make it even healthier.
- If you are preparing it for heart patient, use very little amount of oil or ghee and use cholesterol free butter.
Taste: Salty and mild spicy taste of spices, vegetables and oats.
Serving Ideas: Serve this healthy upma with tea in the morning for breakfast or as afternoon snack. It is a perfect healthy snack that can be packed in kid’s lunch box.
Cooking Time: 20 minutes
Serves: 2 servings
| Ingredients: |
| 1 cup Rolled Oats |
| 1/2 teaspoon Mustard Seeds |
| 1/2 teaspoon Cumin Seeds |
| 1 teaspoon Chana Dal (optional) |
| 2 sprigs Curry Leaves |
| 1 medium Onion, finely chopped |
| 1 Green Chilli, chopped |
| 1/4 cup finely chopped Carrot |
| 1/4 cup finely chopped Capsicum |
| 1 Tomato, finely chopped |
| 5-6 fried Cashew Nuts (optional) |
| 2 tablespoons chopped Coriander Leaves |
| Salt |
| 2 tablespoons Cooking Oil or Ghee (clarified butter) |
| 2 cups Hot Water |
Directions:
- Roast oats in a pan or kadai until they change from white to light brown. Transfer them in a plate and keep aside.
- Heat 2 tablespoons oil in a same kadai or pan. Add mustard seeds and cumin seeds. When seeds begin to pop, add chana dal and curry leaves. Sauté until dal turns light brown for approx. 1 minute. Add chopped onion and chopped green chillies, sauté until onion becomes translucent.
- Add chopped carrot, chopped capsicum and chopped tomatoes, sprinkle salt over it and cook for 2-3 minutes.
- Add and mix roasted oats and cook for a minute.
- Add 2 cups hot water and stir for a minute.
- When it starts to boil, cover with a lid and cook over medium flame.
- Cook until water is absorbed and oats are cooked thoroughly for approx. 7-8 minutes.
- Add chopped coriander leaves and cashew nuts and mix well.
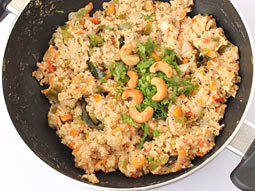
- Turn off flame and transfer healthy oats upma to a serving bowl.
Tips and Variations:
- If you are using steel cut oats, then add 2½-3 cups water because they take more time to cook.
- You can add vegetables like beans, green peas etc. to make it even healthier.
- If you are preparing it for heart patient, use very little amount of oil or ghee and use cholesterol free butter.
Taste: Salty and mild spicy taste of spices, vegetables and oats.
Serving Ideas: Serve this healthy upma with tea in the morning for breakfast or as afternoon snack. It is a perfect healthy snack that can be packed in kid’s lunch box.
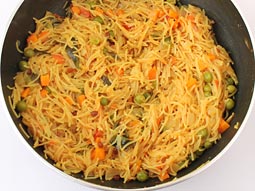
Semiya Upma Recipe

Preparation Time: 5 Minutes
Cooking Time: 20 minutes
Serves: 3 servings
Ingredients: 1 cup Vermicelli (semiya) (thin or thick) 1/2 teaspoon Mustard Seeds
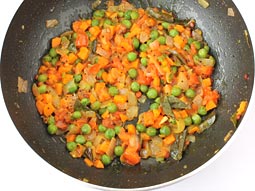
1/2 teaspoon Uzhunnu parippu/ Urad Dal (optional) 1-2 sprigs Curry Leaves 1 large Onion, finely chopped 2-3 Green Chillies, finely chopped 1/2 teaspoon grated Ginger 4 tablespoons Carrot, finely chopped 4 tablespoons Fresh or Frozen Green Peas 1 large Tomato, finely chopped 1/4 teaspoon Turmeric Powder (optional) 2 tablespoons chopped Coriander Leaves Salt 2 tablespoons Cooking Oil or Ghee (Clarified Butter) 1¾ cups + 2 tablespoons hot Water
Directions:
-
 Roast vermicelli in a kadai on medium flame until it turns light brown. Cooking time may be varying according to size and thickness of your kadai. Keep stirring continuously. When done, keep roasted vermicelli aside to cool.
-
 Heat oil or ghee according to your choice in same kadai. Add mustard seeds and allow them to sputter. Add chana dal, urad dal and curry leaves, cook until dals become light brown. Add sliced onion, grated ginger and slit green chillies. Sauté until onion becomes translucent.
-
 Add chopped carrot, green peas, chopped tomatoes and turmeric powder. Sprinkle salt over it and mix well.
-
 Pour 2-tablespoons water and cook covered on low flame until vegetables become soft for around 3-4 minutes.
-
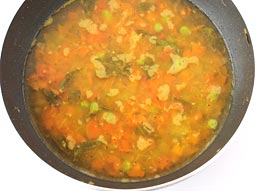 Add 1¾ cups hot water and let it boil for a minute.
-
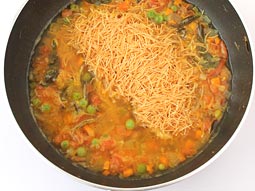 Add roasted vermicelli.
-
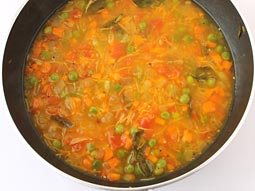 Mix well and cover it with a lid.
-
 Cook until water is absorbed for around 5-7 minutes. Stir in between occasionally to prevent sticking.
-
Turn off flame and transfer semiya upma to a serving bowl. Garnish with chopped coriander leaves and serve.
Taste: Salty, soft and mild spicy
Serving Ideas: Serve it with tea in the morning for breakfast. You can also eat vermicelli upma for a light dinner.
Preparation Time: 5 Minutes
Cooking Time: 20 minutes
Serves: 3 servings
| Ingredients: |
| 1 cup Vermicelli (semiya) (thin or thick) |
| 1/2 teaspoon Mustard Seeds |
| 1/2 teaspoon Uzhunnu parippu/ Urad Dal (optional) |
| 1-2 sprigs Curry Leaves |
| 1 large Onion, finely chopped |
| 2-3 Green Chillies, finely chopped |
| 1/2 teaspoon grated Ginger |
| 4 tablespoons Carrot, finely chopped |
| 4 tablespoons Fresh or Frozen Green Peas |
| 1 large Tomato, finely chopped |
| 1/4 teaspoon Turmeric Powder (optional) |
| 2 tablespoons chopped Coriander Leaves |
| Salt |
| 2 tablespoons Cooking Oil or Ghee (Clarified Butter) |
| 1¾ cups + 2 tablespoons hot Water |
Directions:
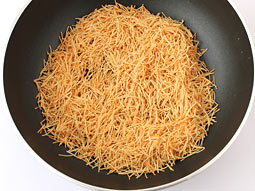
- Roast vermicelli in a kadai on medium flame until it turns light brown. Cooking time may be varying according to size and thickness of your kadai. Keep stirring continuously. When done, keep roasted vermicelli aside to cool.
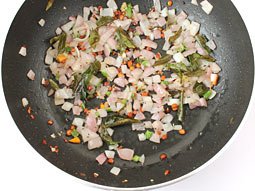
- Heat oil or ghee according to your choice in same kadai. Add mustard seeds and allow them to sputter. Add chana dal, urad dal and curry leaves, cook until dals become light brown. Add sliced onion, grated ginger and slit green chillies. Sauté until onion becomes translucent.
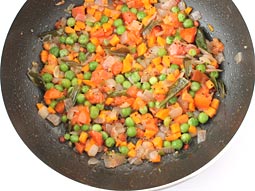
- Add chopped carrot, green peas, chopped tomatoes and turmeric powder. Sprinkle salt over it and mix well.
- Pour 2-tablespoons water and cook covered on low flame until vegetables become soft for around 3-4 minutes.
- Add 1¾ cups hot water and let it boil for a minute.
- Add roasted vermicelli.
- Mix well and cover it with a lid.
- Cook until water is absorbed for around 5-7 minutes. Stir in between occasionally to prevent sticking.
- Turn off flame and transfer semiya upma to a serving bowl. Garnish with chopped coriander leaves and serve.
Taste: Salty, soft and mild spicy
Serving Ideas: Serve it with tea in the morning for breakfast. You can also eat vermicelli upma for a light dinner.
Kozhukatta Recipe

Ingredients
- Rice flour - 1 cup
- Grated coconut - 1 cup
- Jaggery - 150 gm
- Crushed Cardamom - 2
- Water - 1 1/2 cup
- Salt to taste
Method
Step 1
For the filling : Heat a pan and melt the jaggery with 1/4 cup of water and strain the jaggery with a strainer.
Step 2
Reheat the jaggery. Add grated coconut and keep stirring until it turns to thick consistency. Add crushed cardamom and remove from fire. This is for the filling.
Step 3
For the dough - Kozhukatta Maavu: Boil 1 1/2 cup of water with salt. Pour the boiled water to the rice flour little by little and mix it with a spoon. Keep it aside till it is warm enough to handle.
Step 4
Knead the dough and make it into a soft ball. Make medium size balls out of the dough. Take one ball at a time and place it in your palm. Press it with the other hand and make it thin.
Step 5
Starts folding it inwards in such a way that you get a cup shape. Place 2 tsp of the filling and cover it and roll it back into a ball. Repeat the process with the rest of the dough and filling.
Step 6
Heat an appachembu or a steamer and steam the balls or kozhukatta for 10 minutes on a medium flame. Keep it covered for 2 more minutes. Serve hot.
Vattayappam – Steamed Rice Cake

Vattayappam or steamed rice cake is a typical Kerala sweet dish. This delicious thick steamed pancake is made from fermented rice flour and coconut which have soft, thick white spongy texture.
It pairs beautifully with tea or coffee, which makes it a nice tea time snack or breakfast where it will be eaten up in no time. It is loved by almost all Keralites.
You must try this recipe at your home!
Ingredients
- Raw rice (pachari) - 1 cup
- Cooked rice - 1/2 cup
- Grated coconut - 1 cup
- Sugar -1/2 cup
- Water - 1/2 cup
- Instant yeast - 1/4 tsp
- Salt to taste
- Cardamom (Elakka) - 1crushed
- Raisins - 2 tbsp
Method
Step 1
Soak the rice in water for 6 hrs or overnight. Grind the soaked rice with the cooked rice and grated coconut to make a smooth batter. While grinding add enough water.
Step 2
Add the yeast, salt and sugar. Mix well. Keep the batter to ferment overnight.
Step 3
Take a flat bottom greased pan pour the batter. Top it with raisins and cardamom.
Step 4
Take a steamer and steam it for 20 mins on a medium flame.
Step 5
The delicious Vattayappam is ready to be served.
Neypathal – Deep Fried Rice Roti – Ney Pathiri – Malabar Ramadan recipe


Ingredients
- Finest rice powder (to make approximately 30 Pathiri) - 5 glass
- Water (water & rice should be in 1 : 1 ratio) - 5 glass
- Grated coconut - 1 cup
- Cumin seeds - 1 tbsp
- Shallots finely chopped - 8
- Coconut Oil for frying
Method
Step 1
To make the dough, follow below steps: Boil 5 glass water by adding grated coconut, cumin seeds, shallots and salt to taste.
Step 2
Add rice powder to boiling water and mix well.
Step 3
When the mixture is still warm, but manageable hot knead well with hands to make soft dough without adding water. If needed just wet your hands with cold water in between.
Step 4
Then make an apple sized ball out of the dough and on a flat board dusted with rice powder roll the dough into thick shape (thickness of 2 puri).
Step 5
To make perfect round shaped Ney Pathiri - Neypathal - Deep Fried Rice Roti use a glass or lid with sharp edge to cut the Pathiri.
Step 6
Then heat oil in a wok. Oil should be very hot before you start frying. Slide Pathiri to coconut oil.
Step 7
With in a minute the Pathiri will float on top and puff up.As soon as it puffs up, turn it over and fry both sides until deep fried.
Step 8
Take out to tissue paper so that extra oil is sucked by tissue paper. Our Ney Pathiri - Neypathal - Deep Fried Rice Roti is ready to serve. Serve hot with beef roast or any other meat / chicken roast
NEYPATHAL: Deep Fried Rice Pancake With Onion,Fennel &Coconut
 method 1
 Ingredients:2 cups long grain rice (Pachari)
1 cup water
1 1/2 cup freshly grated coconut
1 large onion (200g)
1 cup rice powder (Unroasted)
2 tspful fennel (perumjeerakam)
1 1/4 tsp salt
Ingredients:2 cups long grain rice (Pachari)
1 cup water
1 1/2 cup freshly grated coconut
1 large onion (200g)
1 cup rice powder (Unroasted)
2 tspful fennel (perumjeerakam)
1 1/4 tsp salt
Preparation:
1. Soak the rice in normal tap water for 3-4 hours.
2. Grind it along with minimal water until you get a coarse and grainy mixture. When you touch the ground rice, it should be really grainy.(I have used more water here since my grinder doesn't work with less amount than that).
3. Add coconut, fennel seeds and roughly chopped onions to this and grind for few seconds until everything is just crushed and NOT smooth.
4. Tip the whole mixture in to a large bowl, add salt and mix well.
5. Add the rice powder and mix well using hands.
6. Place a large kadai on high heat. Take a golf size ball and flatten it into thick discs of 4-5 mm width (combined width of 2-3 pooris) using the fingers by placing it on a plastic sheet. (I use a shopper bag cut into square shape). Carefully hold the plastic sheet in one hand and remove the pathal using other hand and slowly slide it in oil.
7. One you put the neypathal in oil you can see bubbles and after sometimes it will float on top and puff up. As soon as it puffs up, using a slotted spoon, flip it over and fry both sides until golden.
method 2
Ingredients:2 cups Parboiled rice (Puzhukkalari)
1 1/2 - 2 cups freshly grated coconut
1 large onion (200g)
2 cups water
1 cup minus 2 tbsful rice powder (Unroasted)
1 1/2 tbs tspful fennel (perumjeerakam)
1 1/4 tsp salt
Preparation:1. Soak the rice in tap water overnight.
2. Grind it along with minimal water until you get a coarse and grainy mixture.
3. Add coconut, fennel seeds and roughly chopped onion to this and grind for few seconds until everything is just crushed and NOT smooth.
4. Tip the whole mixture in to a large bowl, add salt and mix well.
5. Add the rice powder and mix well using hands.
6. Place a large kadai on high heat. Take a golf size ball and flatten it into thick discs of 4-5 mm width (combined width of 2-3 pooris) using the fingers by placing it on a plastic sheet. (I use a shopper bag cut into square shape). Carefully hold the plastic sheet in one hand and remove the pathal using other hand and slowly slide it in oil.
7. One you put the neypathal in oil you can see bubbles and after sometimes it will float on top and puff up. As soon as it puffs up, using a slotted spoon, flip it over and fry both sides until golden.
method 3 (using puttupodi)
1. Boil water and add salt.
2. Crush coconut with fennel and onion. Keep it aside.
3. Add the puttupodi to the boiled water and mix. Add the ground mixture and mix well.
4. The mixture should just be firm enough to make a ball out of it and flatten it and drop it in the oil.
Important points to be Noted:1. If using parboiled rice, the texture differ mainly because of rice. I had to change the rice few times because my neypathal wouldn't come out good. Either it would never get cooked, or it would be too hard. My mom uses sona rice for making this. If you are in the UK, you can get the rice that comes in a blue packet at tesco. It is mentioned in the packet as 'Easy cook long grain rice'. But that works very well for this one.
2. If you are new to this dish, I would recommend you to try with Long grain rice (Pachari), just because,pachari is widely available and it cant go wrong as parboiled rice.
3. If you don't have rice powder, you can lay several layers of towels or thick cloth and pour the batter in this stacked towel until it absorb all the moisture from the ground mixture and you get a soft rice dough that you can form into a ball. My mom makes it this way. She grinds her rice in the large electric mortar (Ammiyum kuttiyum) by adding very minimal water, just few tablespoons of water. Since I don't have have that mortar, I add lot of water for my grinder to work. And have to substitute that moisture by adding rice powder. So use minimal water as possible.
4. If the mixture is too dry, it will be easy to flatten it, but it will start cracking in the oil, and it will be dry. SO make sure,just make the the dough firm enough so that you can make a soft ball and fry it in oil. It might take some time to get the hang of it, but once you are used to it, it will be easy. I remember when I first started making this dish, I was so scared when I start to drop the pathal in oil and I drop it from a distance, I think i should say throwing it from a distance, spilling the oil everywhere and smearing the whole surrounding area with oil. Sometimes oil splashed on me as well. So the best thing is to drop slowly into the oil. Just slide in slowly and it works perfect.
5. If the pathal is too thick or too thin, it might not puff up all the time. So adjust accordingly.
6. And most of all, the oil should be really really hot. After frying few neypathal, the oil temperature drops down drastically. So wait for sometime, until the oil is smoking hot and then continue frying them again.
Best reheating method:The best way to reheat the neypathal would be steaming them until soft. By this way, they really become soft. I also microwave sometimes, but as usual with the Micro-heated stuffs, if not eaten immediately, they go hard.
 Ingredients:2 cups long grain rice (Pachari)
method 3 (using puttupodi)
2. Crush coconut with fennel and onion. Keep it aside.
3. Add the puttupodi to the boiled water and mix. Add the ground mixture and mix well.
4. The mixture should just be firm enough to make a ball out of it and flatten it and drop it in the oil.
Important points to be Noted:1. If using parboiled rice, the texture differ mainly because of rice. I had to change the rice few times because my neypathal wouldn't come out good. Either it would never get cooked, or it would be too hard. My mom uses sona rice for making this. If you are in the UK, you can get the rice that comes in a blue packet at tesco. It is mentioned in the packet as 'Easy cook long grain rice'. But that works very well for this one.
2. If you are new to this dish, I would recommend you to try with Long grain rice (Pachari), just because,pachari is widely available and it cant go wrong as parboiled rice.
3. If you don't have rice powder, you can lay several layers of towels or thick cloth and pour the batter in this stacked towel until it absorb all the moisture from the ground mixture and you get a soft rice dough that you can form into a ball. My mom makes it this way. She grinds her rice in the large electric mortar (Ammiyum kuttiyum) by adding very minimal water, just few tablespoons of water. Since I don't have have that mortar, I add lot of water for my grinder to work. And have to substitute that moisture by adding rice powder. So use minimal water as possible.
4. If the mixture is too dry, it will be easy to flatten it, but it will start cracking in the oil, and it will be dry. SO make sure,just make the the dough firm enough so that you can make a soft ball and fry it in oil. It might take some time to get the hang of it, but once you are used to it, it will be easy. I remember when I first started making this dish, I was so scared when I start to drop the pathal in oil and I drop it from a distance, I think i should say throwing it from a distance, spilling the oil everywhere and smearing the whole surrounding area with oil. Sometimes oil splashed on me as well. So the best thing is to drop slowly into the oil. Just slide in slowly and it works perfect.
5. If the pathal is too thick or too thin, it might not puff up all the time. So adjust accordingly.
6. And most of all, the oil should be really really hot. After frying few neypathal, the oil temperature drops down drastically. So wait for sometime, until the oil is smoking hot and then continue frying them again.
Best reheating method:The best way to reheat the neypathal would be steaming them until soft. By this way, they really become soft. I also microwave sometimes, but as usual with the Micro-heated stuffs, if not eaten immediately, they go hard.
Pathiri
.jpg)
Ingredients:
Pathiri Podi – 2 glass
Water – 2 Glass
Water – To taste
Pathiri Podi – 2 glass
Water – 2 Glass
Water – To taste
.jpg)
Preparation:
Pour the water in a vessel and boil. When the water is boiling put the salt and keep the stove in low flame. Then put the pathiri podi into the water and mix well. One the water get dried put the same in a flat vessel to make dough. The dough should be made when it is heat itself. Mix it till it become soft. Then take a small part of the dough to make lemon size and then spread it to make round shape. Heat the tawa and put this pathiri on it and cook both side. Tasty pathiri is ready.
.jpg)
.jpg)
5 TASTE UTHAPPAM


Ingredients
| Idli dosa batter |
| Carrot, grated |
| Small onion(shallots), sliced thinly |
| Tomato, deseeded and chopped finely |
| Idli podi |
| Coriander leaves |
| Ghee / oil |
Method
|
2. Flip once the bottom turns golden and cook in low to medium flame for a minute or 2 or until golden in colour. Drizzle oil when ever desired
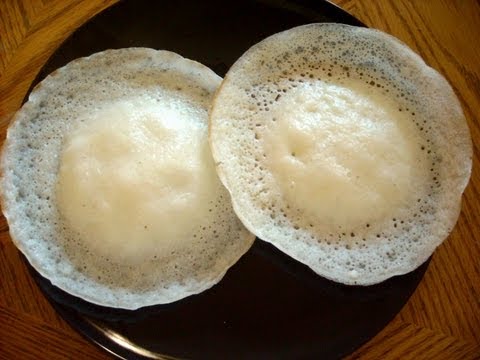
PALAPPAM KERALA STYLEIngredients
- White Long Grain Rice (Pachari)……………2 Cups
- Whole Fenugreek seeds……………………….1/4 Teaspoon (Optional)
- Boiled white Rice………………………………...1/4 cup
- Active instant dry Yeast……………………….3/4 Teaspoon (I use the brand ‘Red Star’)
- Thick coconut milk………………………………1 ¼ cup
- Sugar…………………………………………………..5-6 Teaspoons
- Salt to taste
- A deep pan with a curved bottom and a lid is desirable to make this kind of Appam.
Method of Preparation
- Wash and soak the Rice and Fenugreek seeds together for at least 6 hours. Soaking in warm water will make the process faster.
- Grind together soaked Rice and boiled White rice, adding just enough water needed to grind comfortably in your blender to an almost smooth consistency.
- In a large bowl add the yeast and two teaspoons of sugar. On top of this, add the ground Rice mixture.
- Mix well, cover the bowl airtight and keep in a warm place till the batter doubles in size. If you are using good yeast and the temperature is enough this will rise within 21/2 to 3 hours.
- Once risen, add Coconut milk, Salt and the rest of the Sugar and let it rise one more time. This second rising is essential to make the Appam soft.
- Heat the pan on medium heat, rub the pan with some oil and add a ladle full of batter. 2 oz or a quarter cup of batter will make a good sized Appam. Give it a swirl to get the characteristic lace. Close the lid and let it cook till the lace becomes light brown and the middle portion is cooked through. Serve hot.
Notes:
- Fenugreek seeds give a nice brown color to the Appam. There is no other purpose for this addition. It is strictly optional.
- The way I use Yeast here is much different from the way yeast are used often. This way is used only for instant variety Yeast which comes as slender, slightly long granules. If you are using the regular round Yeast, mix it with 3-4 Tablespoons of warm water and keep aside, covered for 5 minutes. By this time you can see bubbles on top, showing Yeast activity. Mix this with the Rice batter.
- If you are grinding this in the evening and it is already raised before night, mix in the coconut milk, salt and sugar and keep this in the refrigerator. It will rise slowly in the refrigerator and when you are ready to use allow it to rise at room temperature for at least 1 hour.
- Don’t add salt during the first rising time as it will retard the growth of the Yeast. Once the Yeast is in its full activity, add the salt, that is, before the second rise.
- You can decide on the sweetness of the Appam by adding more or less sugar.
- My mother in law uses regular Cow’s milk instead of coconut milk, and that works well too. This is an easy substitute if you don’t have access to coconut milk easily.
Make it, enjoy the deliciousness and
serve it to your family with love....
fresh mussels/ kallummakaya roast

Ingredients:
Fresh mussels /Kallummakaya : 15 (medium size)
For Stuffing:
Rice flour : 2 cups
Dessicated coconut / Freshly grated coconut : 1/4 cup
Shallots/ small onion : 4-5 ( chopped)
Cumin seeds : 1/2 tsp/cheriya jeerakam
Fennel seeds : 1/2 tsp/ perum jeerakam
Green chilli : 1 (chopped)
Ginger : a small piece
Curry leaves : few
Salt to taste
For the Batter:
Chilli powder : 2 tbsp
Turmeric powder : 1/2 tsp
cumin+fennel seed powder : 1/2 tsp
Rice Flour : 1 tbsp
Salt to taste
How to cook:
1. Boil the mussels with enough water,till the shells open. Drain it and clean the mussels and keep it aside.
(Note : Shells must be scrubbed in water with a stiff brush to remove any barnacles and sand. Do not use shells that have not opened).
2. Coarsely grind grated coconut, small onion, cumin seeds, fennel seeds, green chillies, ginger, curry leaves.
3. Dilute salt in water and add to the rice powder.
4. Mix well and make a smooth dough by adding enough hot water.
5. Take a prepared dough ball and stuff the mussels, repeat the process with all the mussels.
6. Steam cook the stuffed mussels for 15-20 minutes and keep aside to cool.
7. Scoop out the mussels out of their shells.
8. Make a spicy mixture using red chilli powder, turmeric powder, rice powder and salt.
9. Heat oil in pan, when its hot, dip each stuffed mussel in this spicy mixture and deep fry it. Serve.
https://www.facebook.com/goodfoodcookbook
No comments:
Post a Comment